Are you looking for a simple invoicing solution that saves you time and organizes your billing process?
Google Sheets are for you. The customizable templates, built-in formulas, and easy-to-use interface enable you to create professional invoices without spending a fortune on expensive invoicing tools.
Both freelancers and small business owners can use Google Sheets to make invoices and streamline their entire billing process. But, making an invoice in Google Sheets requires you to follow some important steps.
In this blog, we will showcase how to make an invoice in Google Sheets. This will help you to stay organized and manage your finances effortlessly.
What You'll Learn
- 01Step-by-step process to create professional invoices in Google Sheets
- 02Key elements every Google Sheets invoice must include
- 03Top 5 benefits of using Google Sheets for small business invoicing
- 04How Google Sheets compares to Google Docs for invoicing
- 05Customization options for tax compliance and payment tracking
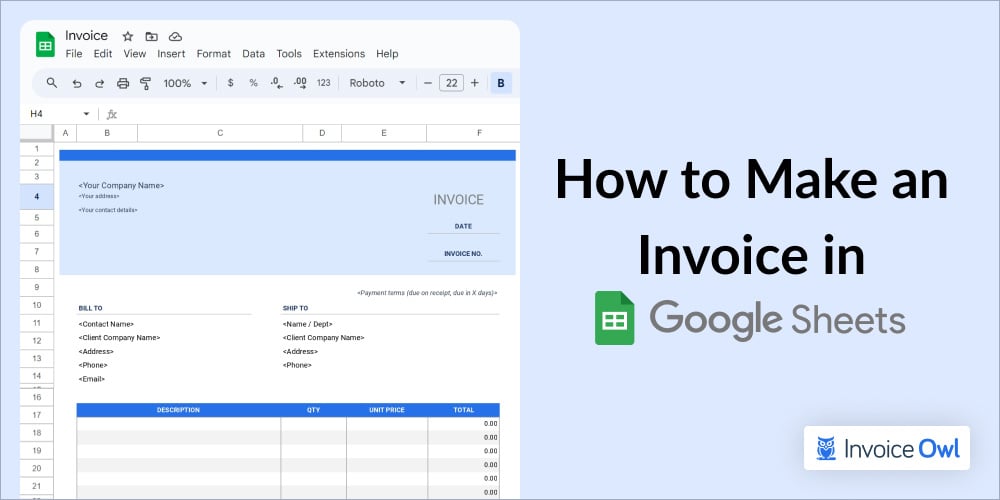
A Step-by-Step Guide to Creating an Invoice in Google Sheets
Here is your step-by-step guide to creating free invoice templates using Google Sheets.
No matter if you're a freelancer or a small business owner, this guide will help you create professional invoices to meet your specific business needs.
Follow these 10 important steps to make an invoice in Google Sheets:
Step 1: Open Google Sheets
Start with opening the Google Sheets and login to your Google account. In case, you don't have an account, create a new one.
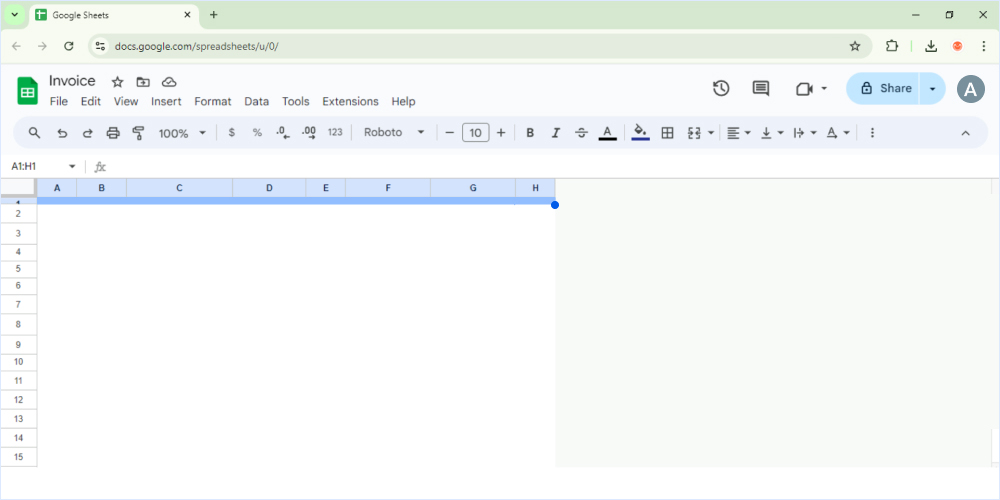
Step 2: Create a new blank spreadsheet
After logging in, go to the blank spreadsheet option and create a new one. You will come across an empty sheet to create your invoice template in Google.
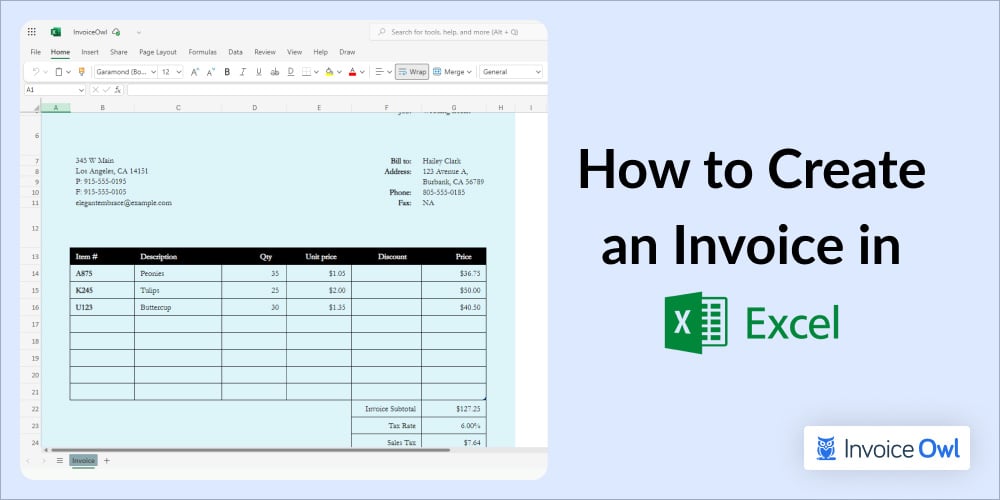
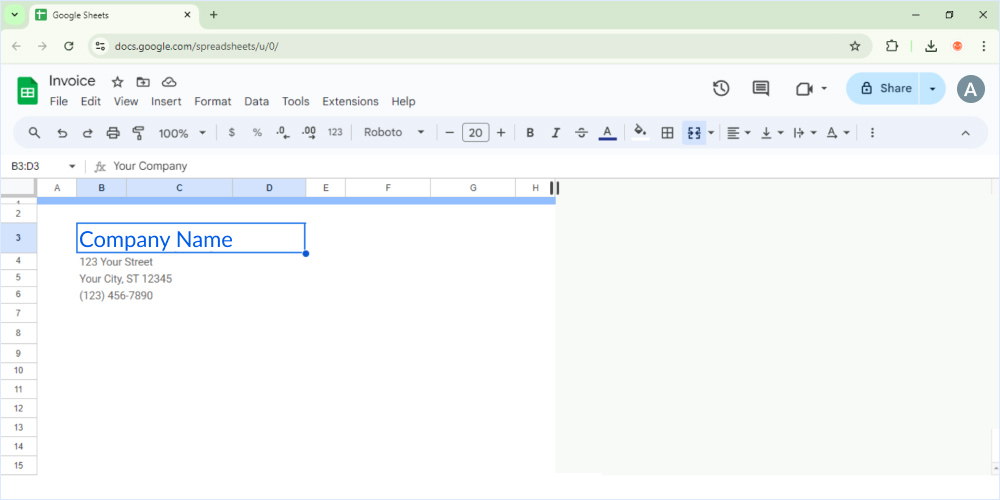
Step 3: Set up your column headers
Ensure to add important information like your company details, billing contact, and address.
Here is the way to set it up properly:
- Merge cells: Click and drag the cells from A1 to H1. Go to the toolbar and click on the merge cells option.
- Add important information: Add your organization's name in the merged cells. If needed, you can use the toolbar to adjust the font size and style.
- Additional details: Add your contact details and the address below the organization's name.
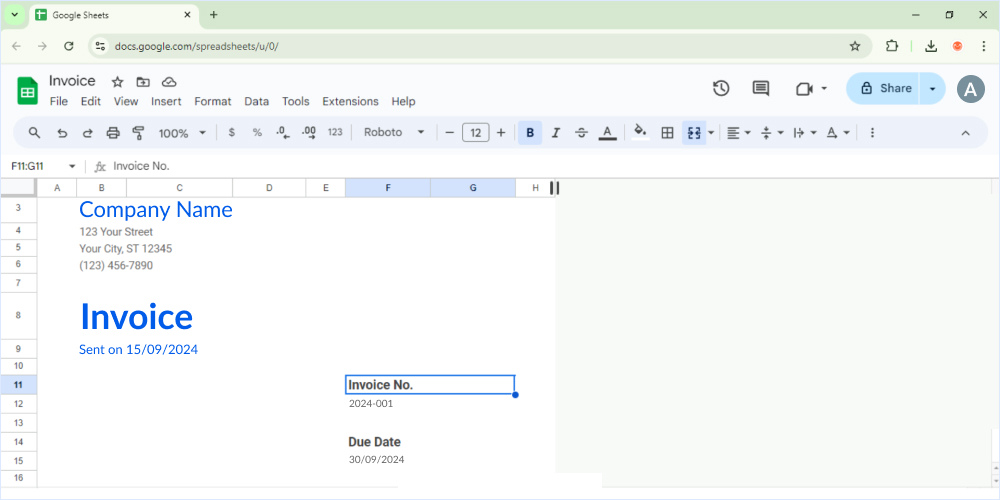
Step 4: Add invoice details
After mentioning the company name, let's move on to add specific details to the blank invoice template. Read the following:
- Invoice details date: Add the invoice date in the cells from B to C column.
- Invoice number: Add the invoice number in the cells from F to G column.
- Due date: Next, write the due date and add the payment due date.
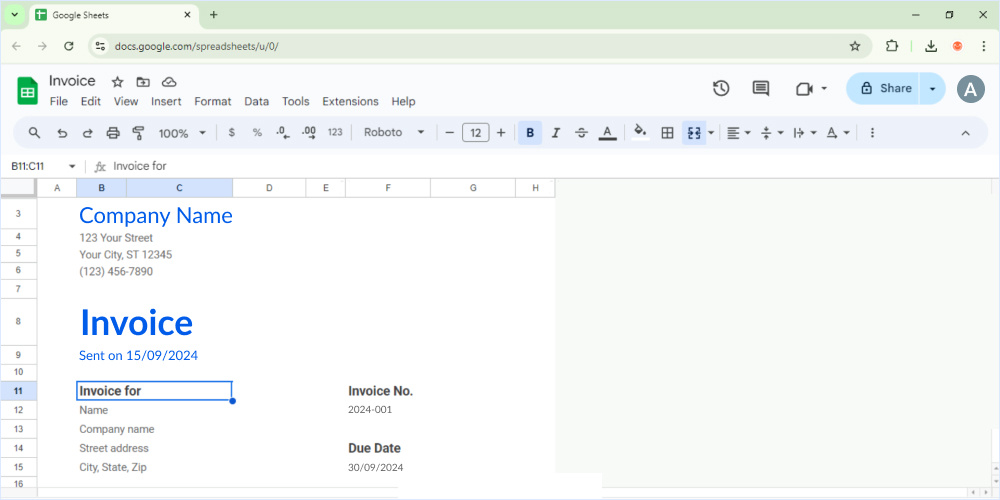
Step 5: Client information
Adding the client's information to the Google Sheets invoice template is essential.
- Invoice for: Write an invoice for cells B11 to C11 and add your client's name.
- Additional information: Add your customer's address along with their contact details for better connectivity.
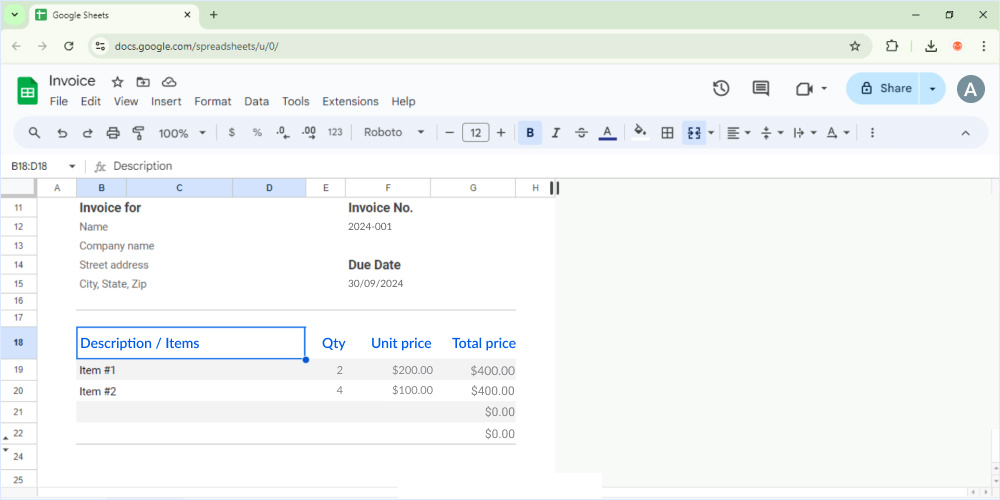
Step 6: An itemized list of services or products
In this step, we will add the item description with their respective prices to offer better clarity to the client.
- Headers: Add the description, unit price, and total price in separate columns.
- Items: List each service and product offered to the clients.
- Total items: Calculate the total amount by multiplying the quantity by the unit price of each item.
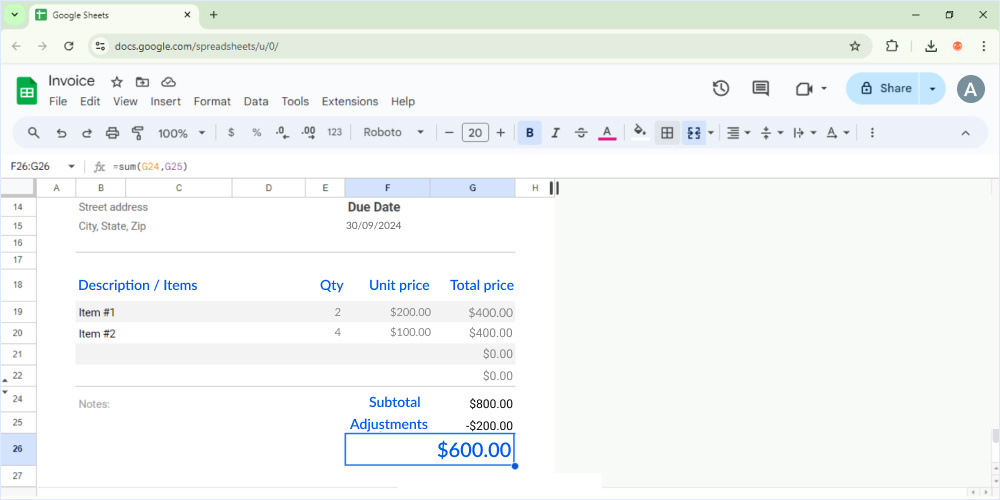
As shown in the image, the total amount of item 1 is $400 (2 × $200), and for Item 2, it is $400 (4 × $100).
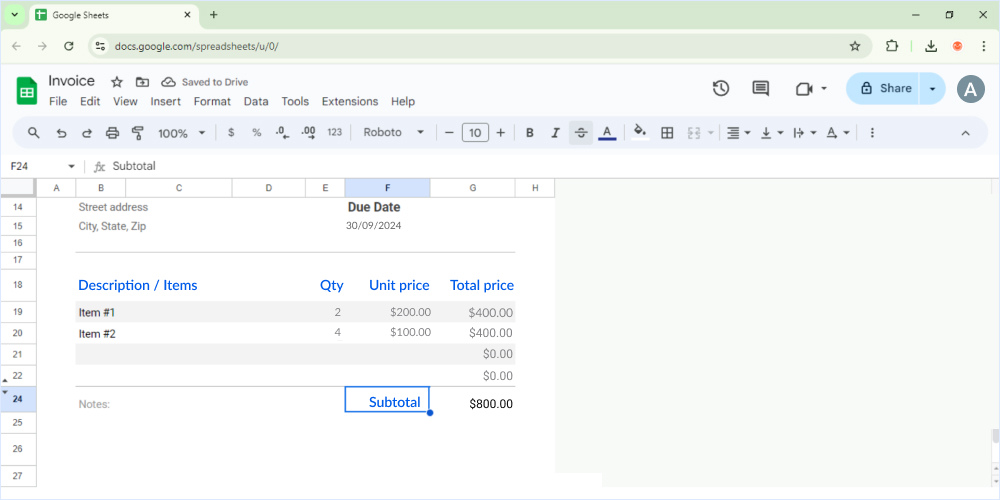
Step 7: Calculate totals
It is always a better idea to add formulas for calculating totals.
- Subtotal: Add a cell for mentioning subtotal. You can make use of formulas like =SUM(G19:G20). Here, the G19 and G20 comprise individual totals, adding up to a subtotal of $800.
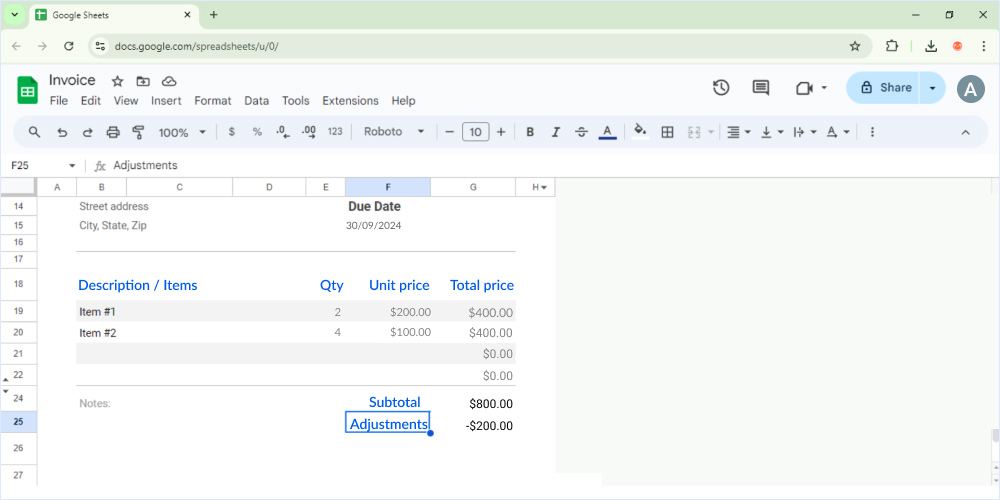
- Adjustment: If required add adjustments. It can be anything ranging from a discount to a surcharge. Suppose, you wish to offer a discount of $200, then you'll have to write -200 in the adjustment cell. To subtract the $200, make use of formulas like =G24-200.
- Total amount: After offering the discount, add another cell to mention the total below adjustments. As shown below in the image, the total amount due would be $600.
Use formulas like =SUM() and =PRODUCT() to automate calculations. This reduces manual errors and saves time when updating invoice amounts.
Step 8: Additional notes
In case, you need to add any additional notes or payment terms,
Write notes in the cell and provide any additional information such as payment methods or terms.
Step 9: Format your invoice
Ensure to make your invoice as professional as possible.
- Alignment: To enhance readability, align your texts properly.
- Fonts: Make use of bold fonts for headers.
- Borders: Make use of borders to differentiate between two sections.
Step 10: Save as a template and send
Once your invoice layout is ready, save it as an invoice template. Go to files and save this document as an invoice template.
Reuse: Whenever you need to create a new invoice, open this ready-to-use Google Sheets invoice template and fill in the new details.
Google Sheets Invoice Template
As a freelancer or a small business owner, you might need a quick and efficient way to create invoices, try our free Google Sheets invoice template.
Simply edit the service or product details, add your contact information, and personalize it with your business name and logo. Once completed, you can instantly send it to your clients, ensuring a professional and streamlined invoicing process.
What are the Top 5 Benefits of Using Google Sheets for Small Businesses?
Here is a list of the top 5 benefits of using Google Sheets for small businesses:
1. Cost-effective
Google Sheets is a great tool for small businesses working on tight budgets. It is a free tool that offers a spreadsheet solution and is accessible from any device with internet access. This makes it a viable option for small businesses that need to create invoices without expensive software.
2. Customizable for various U.S. Tax requirements
It is easier to customize your invoice templates in Google Sheets to comply with state-specific taxes like sales tax. The add-ons available in Google Sheets allow you to meet your specific business needs without any custom software development.
3. Compliance with U.S. accounting standards
Another benefit of Google Sheets is its ability to customize free invoice templates in compliance with U.S. Generally Accepted Accounting Principles (GAAP). This compliance is of great help to small businesses like contractors, freelancers, and electricians to maintain accurate financial records.
4. Cloud-based storage for compliance
Google Sheets invoice templates allow you to store your invoices in the cloud (Google Drive) automatically. This cloud-based storage helps to make your financial records accessible, and ready for tax audits or compliance with IRS requirements.
5. Integration with U.S.-based payment tools
Google Sheets can be linked to popular U.S. payment platforms like Stripe, PayPal, or ACH transfers. This will help you to streamline your billing process and ensure timely and secured payments from the clients.
While Google Sheets integrates with payment platforms, it requires manual setup and tracking. For automated payment processing, consider dedicated invoicing software.
What are the Key Elements of an Invoice in Google Sheets?
The key elements of an invoice in Google Sheets are stated below:
Alternative Tools for Invoicing (Comparing Google Sheets to Google Docs)
Here are the key differences between Google Sheets and Google Docs.
Google Sheets vs Google Docs for Invoicing
| Features | Google Sheets | Google Docs |
|---|---|---|
| Best for | Managing invoices with multiple line items, calculations, and detailed financial data | Managing text-based invoices with minimal formatting is simple. You can create an invoice in Google Docs for easy editing and formatting flexibility. |
| Ease of use | User-friendly for those familiar with spreadsheets, especially with formulas for calculations | Extremely easy to use for basic invoicing but lacks automation features like formulas |
| Customization options | Highly customizable with cell formatting, borders, colors, and formulas | Limited customization, mainly text formatting (bold, italics, font size) |
| Automation | Automatic calculations for totals, taxes, and discounts via formulas | No automation; all calculations need to be done manually |
| Templates available | Multiple pre-made professional invoice templates with integrated calculations | Limited pre-made templates; invoices need to be created from scratch or copied |
| Integration with payment systems | No direct integration, but you can manually add links or notes for payment methods | No direct integration; only allows simple text for payment details |
| Collaboration | Real-time collaboration; multiple users can edit simultaneously with comments | Allows real-time collaboration but is more suitable for discussions than data management |
| Data tracking | Excellent for tracking and updating invoice numbers, amounts, and dates in one sheet | Limited tracking; no structured way to manage multiple invoices within one document |
| Complexity of invoices | Ideal for complex invoices with itemized services, taxes, and multiple rows of data | Best for simple, one-off invoices with minimal complexity |
| Download formats | Easily downloadable in Excel, PDF, or CSV formats | Can be downloaded as Word, PDF, or simple text documents |
| Security | Google Drive-based security with sharing restrictions, and history tracking | Same Google Drive-based security, but not ideal for data-heavy documents |
| Overall efficiency | High efficiency for businesses with recurring or detailed invoicing needs | Lower efficiency due to manual effort required for calculations and formatting |
Looking for a Customizable Invoice Template?
Switch to InvoiceOwl. Our free professional invoice templates enable you to customize invoices according to your business requirements.
Try For FREEGoogle Sheets: An Effective Solution for Invoice Creation
Creating invoices with Google Sheets is one of the most simple ways to manage your billing process. Google Sheets is power-packed with several features like customizable templates, built-in formulas, and easy sharing options. These features make it a great option for freelancers and small business owners.
Another amazing thing about Google Sheets is its free availability which eliminates the need for expensive software. The flexibility and cloud storage of Google Sheets streamline the entire invoicing process and help you stay organized without any hassle.
Google Sheets works well for basic invoicing needs, but businesses with high invoice volumes or complex requirements may benefit from dedicated invoicing software with automation and payment gateway integration.
Frequently Asked Questions
Yes, Google Sheets are power-packed with customizable invoice templates. These templates ensure that you meet the U.S.-specific business standards and state-specific requirements.
Start by using formulas like =SUM(A1:A10)*TaxRate. In this specific formula, the tax rate is in accordance with your state or local sales tax, ensuring compliance with U.S. tax laws.
Yes, all you have to do is create a separate tab for every invoice or specific client within a single file. With this, it becomes easier to track payments and outstanding balances which holds great importance in U.S. tax reporting.
Google Sheets lacks the recurring invoicing functionality. So, you'll have to manually, duplicate each invoice every month and update the date and amount as required.
Yes, if your invoice comprises all important details like the business name, contact details, tax ID, and payment terms. Adding all these details to the invoice makes it eligible for tax and official purposes in America.
Yes, an Employer Identification Number (EIN) or tax ID is one of the most important aspects of tax compliance in the U.S. Their importance reaches new heights during the year-end tax filing and while dealing with clients.
Opt for a Google Drive or store them in PDF format to maintain a digital record. This practice ensures you have the documents ready when required to file taxes with the IRS.
Google doesn't have an invoice generator. But, it provides you with invoice templates in Google Sheets invoice template. All you need to do is copy and create a brand-new invoice.
It depends on your project type. You can generate invoices before starting the project, or send recurring invoices weekly or monthly to remind you about the payment. Last but not least, raise an invoice after the product or service has been provided from your side.
Google Sheets comprises basic security features for general use but lacks advanced features. These advanced features consist of compliance with U.S. standards such as PCI-DSS. If your business deals with sensitive financial data, then you must opt for invoicing tools like InvoiceOwl or Zoho.
Google Sheets can handle smaller invoice volumes but fails to handle large-sale invoices. Organizations with high invoice volumes should opt for InvoiceOwl or QuickBooks. These invoicing platforms enable you to automate and streamline the entire billing process.
No, Google Sheets doesn't offer any direct payment gateway integration. You need to track the payments manually or use a third-party tool to make payments. With invoicing tools like InvoiceOwl, FreshBooks, and QuickBooks, you can experience seamless payment gateway integration. These invoicing tools help clients make payments directly from the invoice itself.